OpenRCT2-PeepEditor
A plug-in for OpenRCT2 to modify properties of guests and staff members.
Author:
 Manticore-007
Submitted:
over 4 years agoUpdated:
2 days agoStars:
21Tags:
License:
MITLinks:
GitHub Repository Manticore-007 on GitHubPeepEditor plugin for OpenRCT2
This plugin lets you modify and monitor the properties of your park guests and staff members. Download here!
The main window:
Overview
Here you can see the most basic information about the peep you've selected. The buttons do the following:
Activates the tool to select a guest or staff member.
Selects multiple guests on a grid of tiles.
All the guests on the map will be selected, except the ones on rides.
Opens a text box where you can put in a new (longer than normally) name for your guest or staff member.
When you press this button, the screen will focus on the selected guest or staff member.
Remove the selected guest or staff member.
Turn on/off tracking information for this guest - (If tracking is on, guest’s movements will be reported in the message area).
Frozen peeps list
Here you have two lists of frozen peeps; guests and staff members. A nice overview of where you can find your peeps used for peep scenes. Highlighting the peep will make the main viewport scroll to its location. Clicking it will make it editable like when using the pipette. On the dropdown menu, you can switch between guests and staff members. With the textbox next to it, you can filter by name; it is not case sensitive and it may be a part of the name.
Options
The options should be self-explanatory.
About
Info about the plugin, and special thanks to the people that helped me one way or another.
The side window
Placement
This window is to position and set the direction of the selected peep. Freezing the peep (traffic lights or flags) has been moved to this tab, since it is a part of positioning. When moving or directing a peep, don't worry about the rotation of the map, the interface rotates along with it. I even added a nice little axis widget to assist you which axis is wich way.
Appearance
Staff member appearance. Every type of staff member has their own options. Here you can modify their staff type, uniform colour and costume. Below that you can pick the animation they are showing an if the are completely frozen, you can also set the frame of the animation.
Guest appearance. For a guest you can select the colours of their t-shirt, trousers, hat, balloon and umbrella respectively. The animation section is the same as with a staff member.
Actions
Here you can set actions for guests like make them leave the park or blast them to bits. For staff members you can set their orders, like the staff member windows ingame. This sections needs some work...
Physiology
For the guests you can see and modify how they are feeling. It is kind of similar as the guest window ingame. When multiple guests are selected you will see box plots for each property so you can see how the overall mood in the park is. Staff members don't have anything to show here, they are taken care of very well.
Items
Feeling generous or greedy? On this tab you can manage the items guests possess. When multiple guests are selected you can see how many guests on the map have respective item, here you can also give them selected item. In both cases you can remove the items by clicking it, don't worry... you will get a popup to finalize the removal. For the staff members you can see how they are doing what they are payed to do.
Multiplayer
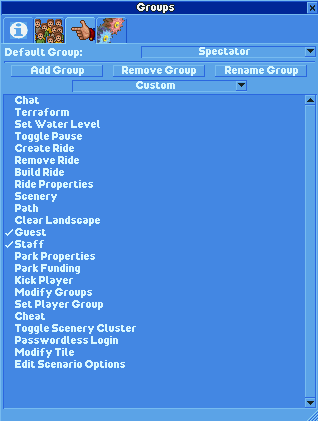
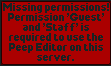
From version 23.1.1 on, the plugin is supported in multiplayer (on develop version, release version is not supported yet). To use it in a mulitplayer server you follow the installation topic below, but on the server side. When a client is connected to the server it will automatically download this plugin. The player needs permission to modify guests and staff, else the plugin will generate an error
The error message:
Installation
- Download the latest version of the plugin from the Releases page.
- To install it, put the downloaded
*.jsfile into your/OpenRCT2/pluginfolder.- Easiest way to find the OpenRCT2-folder is by launching the OpenRCT2 game, click and hold on the red toolbox in the main menu, and select "Open custom content folder".
- Otherwise this folder is commonly found in
C:/Users/<YOUR NAME>/Documents/OpenRCT2/pluginon Windows. - If you already had this plugin installed before, you can safely overwrite the old file.
- Once the file is there, it should show up ingame in the dropdown menu under the map icon.
Building the source code
This project is based on wisnia74's Typescript modding template and uses Nodemon, ESLint and TypeScript from this template.
- Install latest version of Node and make sure to include NPM in the installation options.
- Clone the project to a location of your choice on your PC.
- Open command prompt, use
cdto change your current directory to the root folder of this project and runnpm install. - Find
openrct2.d.tsTypeScript API declaration file in OpenRCT2 files and copy it tolibfolder (this file can usually be found inC:/Users/<YOUR NAME>/Documents/OpenRCT2/bin/orC:/Program Files/OpenRCT2/).- Alternatively, you can make a symbolic link instead of copying the file, which will keep the file up to date whenever you install new versions of OpenRCT2.
- Run
npm run build(release build) ornpm run build:dev(develop build) to build the project.- Default output folder for release builds:
(project directory)/dist - Default output folder for develop builds:
(documents)/OpenRCT2/plugins - If your plugin folder is located elsewhere (on for example a non-Windows OS), you can modify it in
rollup.config.js.
- Default output folder for release builds:
Hot reload
This project supports the OpenRCT2 hot reload feature for development.
- Make sure you've enabled it by setting
enable_hot_reloading = truein your/OpenRCT2/config.ini. - If you are on a non-Windows OS, open
rollup.config.jsand change the output file path to your plugin folder.- Example:
C:/OpenRCT2/plugin/ProxyPather.js. - Make sure this path uses
/instead of\slashes!
- Example:
- Open command prompt and use
cdto change your current directory to the root folder of this project. - Run
npm startto start the hot reload server. - Use the
/OpenRCT2/bin/openrct2.comexecutable to start OpenRCT2 with console and load a save or start new game. - Each time you save any of the files in
./src/, the server will compile./src/registerPlugin.tsand place compiled plugin file inside your local OpenRCT2 plugin directory. - OpenRCT2 will notice file changes and it will reload the plugin.
Notes
Don't touch app.js, even though it's just an empty file. Its existence makes Nodemon happy, and Nodemon is what watches your files for changes & fires off new dev builds for hot reloading.
Thanks to wisnia74 for providing the template for this mod and readme.
Built with Basssiiie's OpenRCT2-FlexUI user interface library for creating windows in OpenRCT2 plugins.